 Emmanuel John I'm a full-stack software developer, mentor, and writer. I am an open source enthusiast. In my spare time, I enjoy watching sci-fi movies and cheering for Arsenal FC. Table of contents
 - Prerequisites
- The core idea behind A2UI: Declarative UI, not generated code
- Setup and installation
- Building with the A2UI bridge
- Conclusion
 Introducing Galileo AI LogRocket’s Galileo AI watches every session, surfacing impactful user struggle and key behavior patterns. LEARN MORE
See how LogRocket's Galileo AI surfaces the most severe issues for you
No signup required
Check it outYou’ve probably interacted with AI agents recently, most likely through an endless stream of chat bubbles. That works fine for simple tasks, but it breaks down fast when you need richer, back-and-forth interactions like collecting structured user input through a UI. That’s where A2UI comes in.
A2UI (Agent to UI) is a UI protocol from Google that lets AI agents generate user interfaces on demand. It introduces declarative mini-apps where UI components and actions are defined in a schema, and the agent can operate them automatically. Think Telegram-style mini-apps: small, self-contained interfaces that work without custom integration code.
Instead of a long question-and-answer loop, agents can now send interactive, native interfaces directly to the client.
In this guide, we’ll build an A2UI mini-app end-to-end. We’ll cover the declarative UI schema, action definitions, the A2UI Bridge, agent integration, and finish with a complete working demo.
🚀 Sign up for The Replay newsletter
The Replay is a weekly newsletter for dev and engineering leaders.
Delivered once a week, it's your curated guide to the most important conversations around frontend dev, emerging AI tools, and the state of modern software.
Prerequisites
To explore A2UI, you will need the following:
- Node.js is installed for frontend dependencies.
- Python 3.9 or higher
- You have UV installed
- Git is installed on your machine(optional)
The core idea behind A2UI: Declarative UI, not generated code
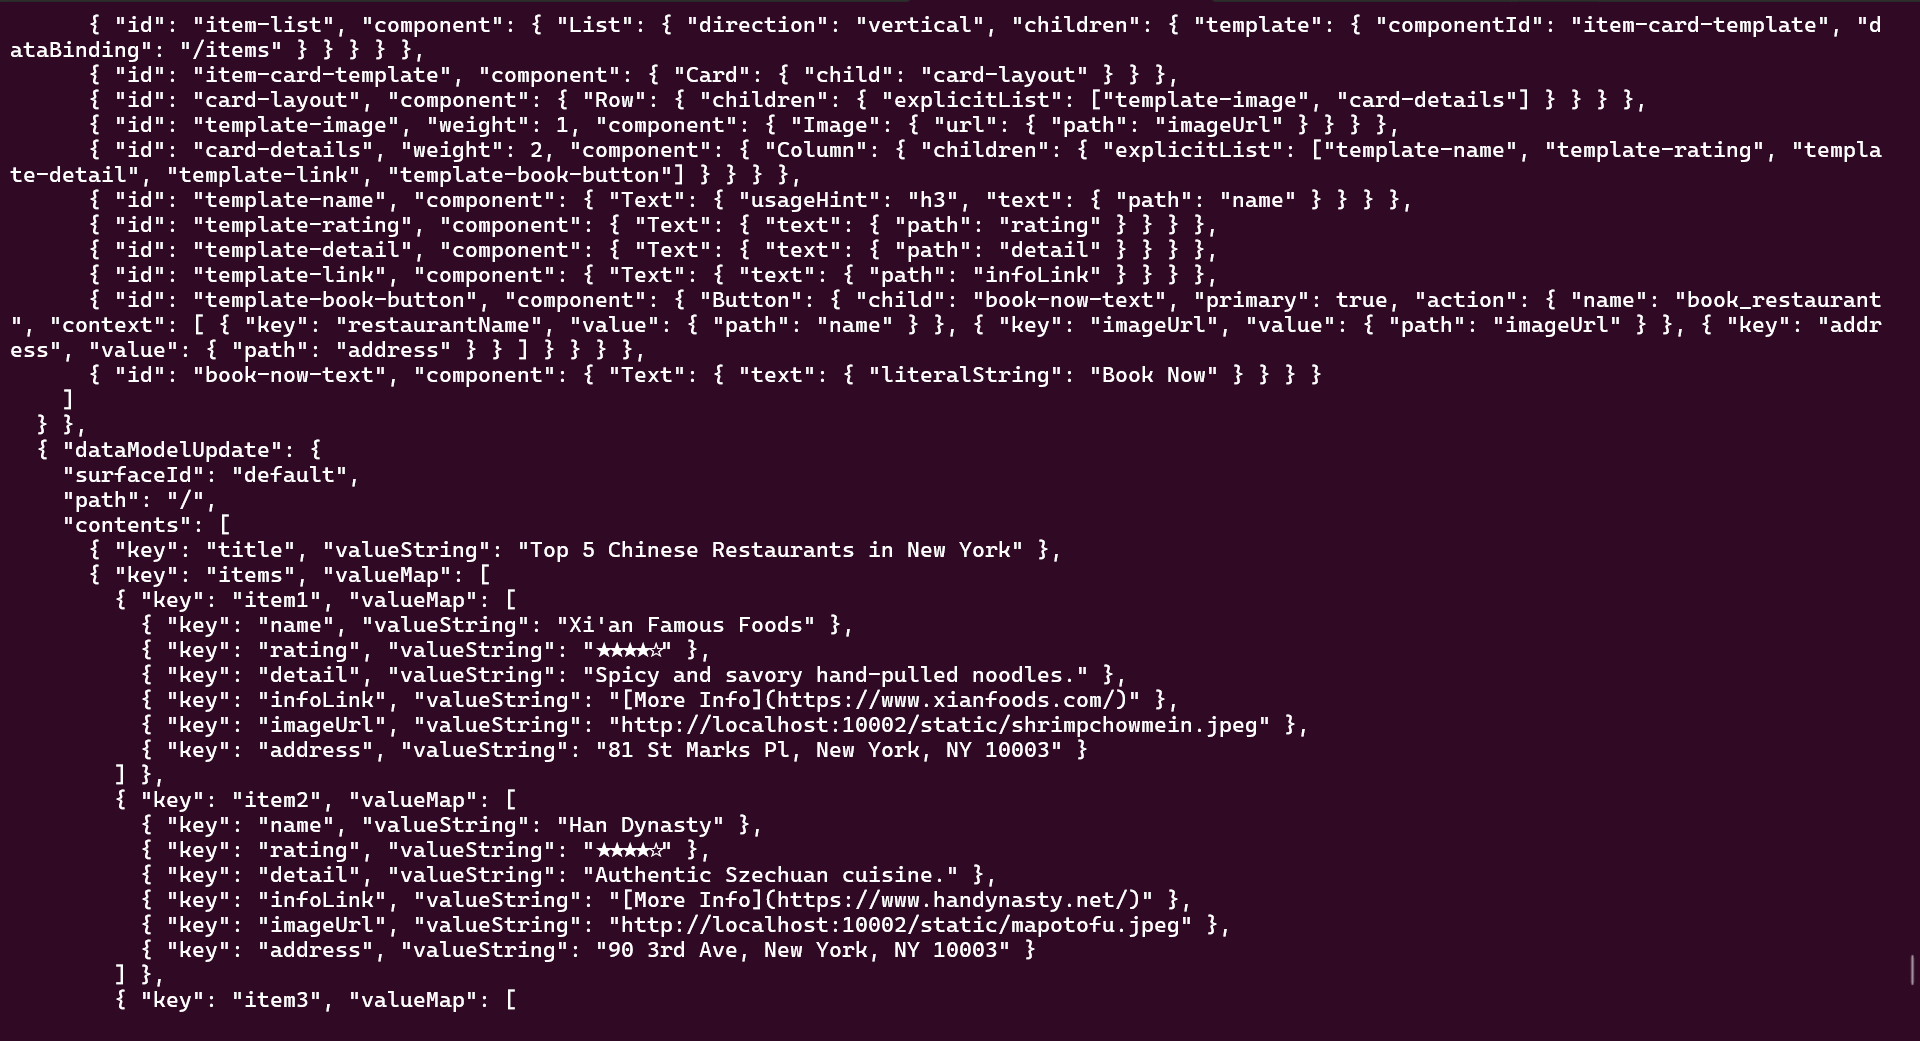
A2UI treats UI as structured data, not executable code. The AI doesn’t send HTML, CSS, or JavaScript. It sends JSON describing what it needs. The AI decides it needs a form with a date picker and a submit button. It builds a JSON object defining those components. Your app receives that JSON and renders it using your own trusted, native components.
A2UI is currently in public preview. We’ll pull down the official codebase to see how it works, then build our own version using a community-made React renderer.
Setup and installation
Let’s digress for a second. If you’re wondering what UV is, here’s the quick answer.
UV is a Python package manager.
You can install it with the following command:
# For macOS and Linux curl -LsSf https://astral.sh/uv/install.sh | sh # For Windows powershell -ExecutionPolicy ByPass -c "irm https://astral.sh/uv/install.ps1 | iex"
Clone the A2UI repository
First, clone the official A2UI repository to get access to the sample code.
git clone https://github.com/google/a2ui.git cd a2ui
Get your Gemini API key
The Python agent uses Google’s Gemini model to generate the UI.
Head to Google AI Studio, create an API key, and export it:
# For macOS and Linux export GEMINI_API_KEY="your_api_key_here" # For Windows (in Command Prompt) set GEMINI_API_KEY="your_api_key_here" # For Windows (in PowerShell) $env:GEMINI_API_KEY="your_api_key_here"
Run the Python AI agent
Now let’s fire up the backend agent. It’ll listen for requests, call Gemini, and stream A2UI JSON back to the client.
cd samples && cd agent && cd adk && cd restaurant_finder
Then run this command:
uv run .
This installs the required dependencies and starts the server.
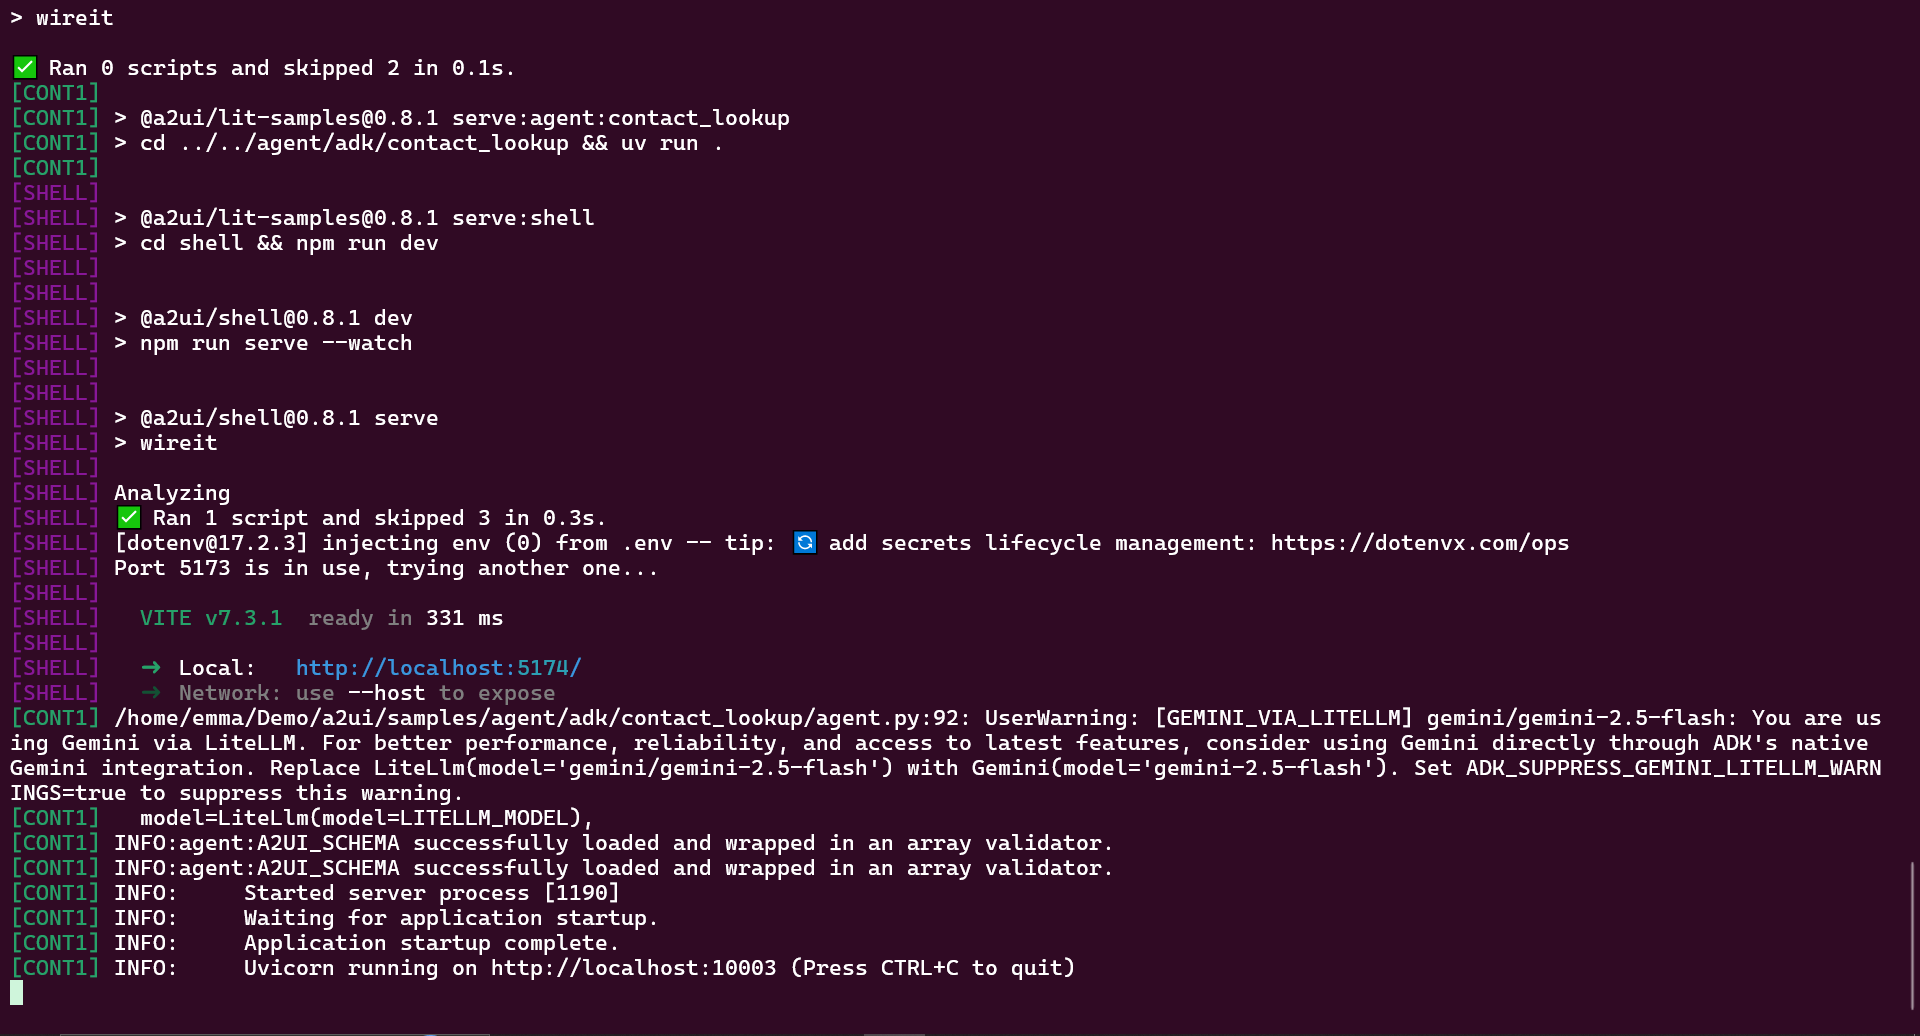
If everything starts up cleanly, you should see a screen like this:
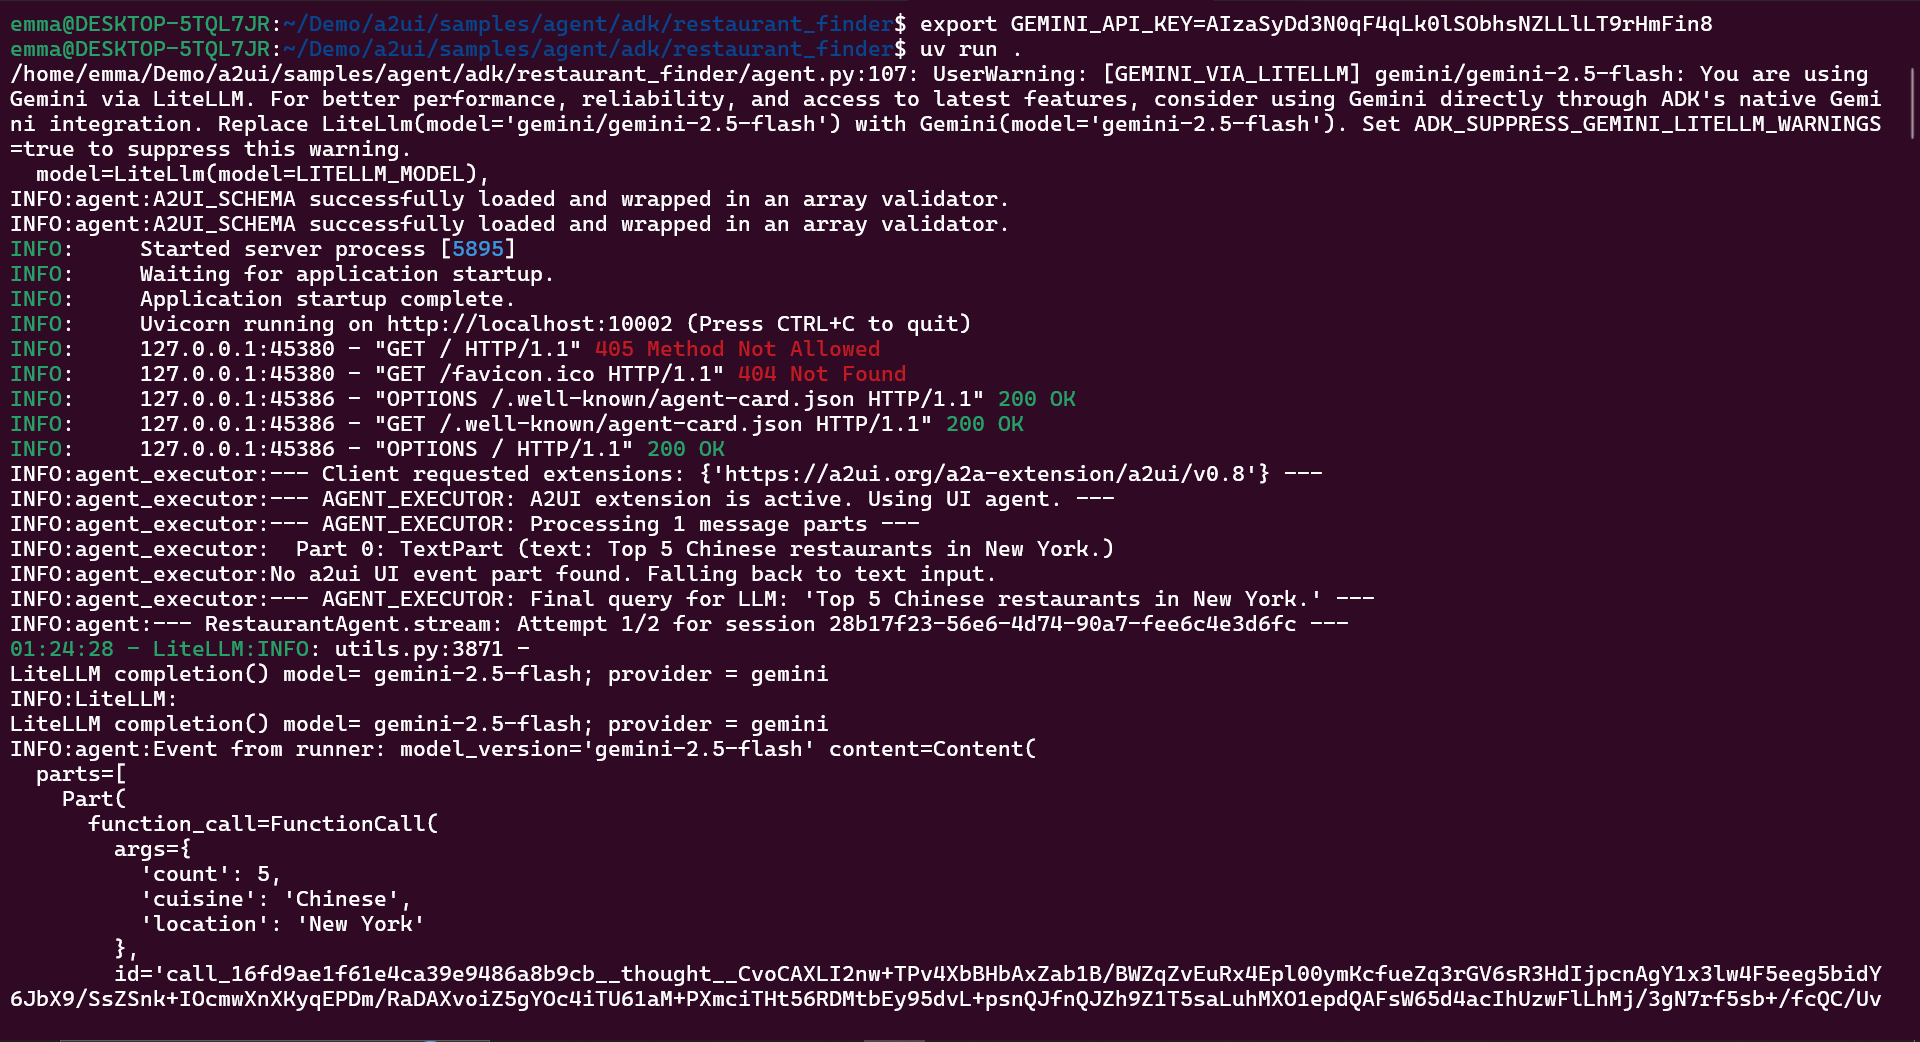
This starts the agent at http://localhost:10002.
Build and run the client
With the backend running, it’s time to set up the frontend.
Inside the A2UI folder, copy and run this command:
cd samples && cd client && cd lit
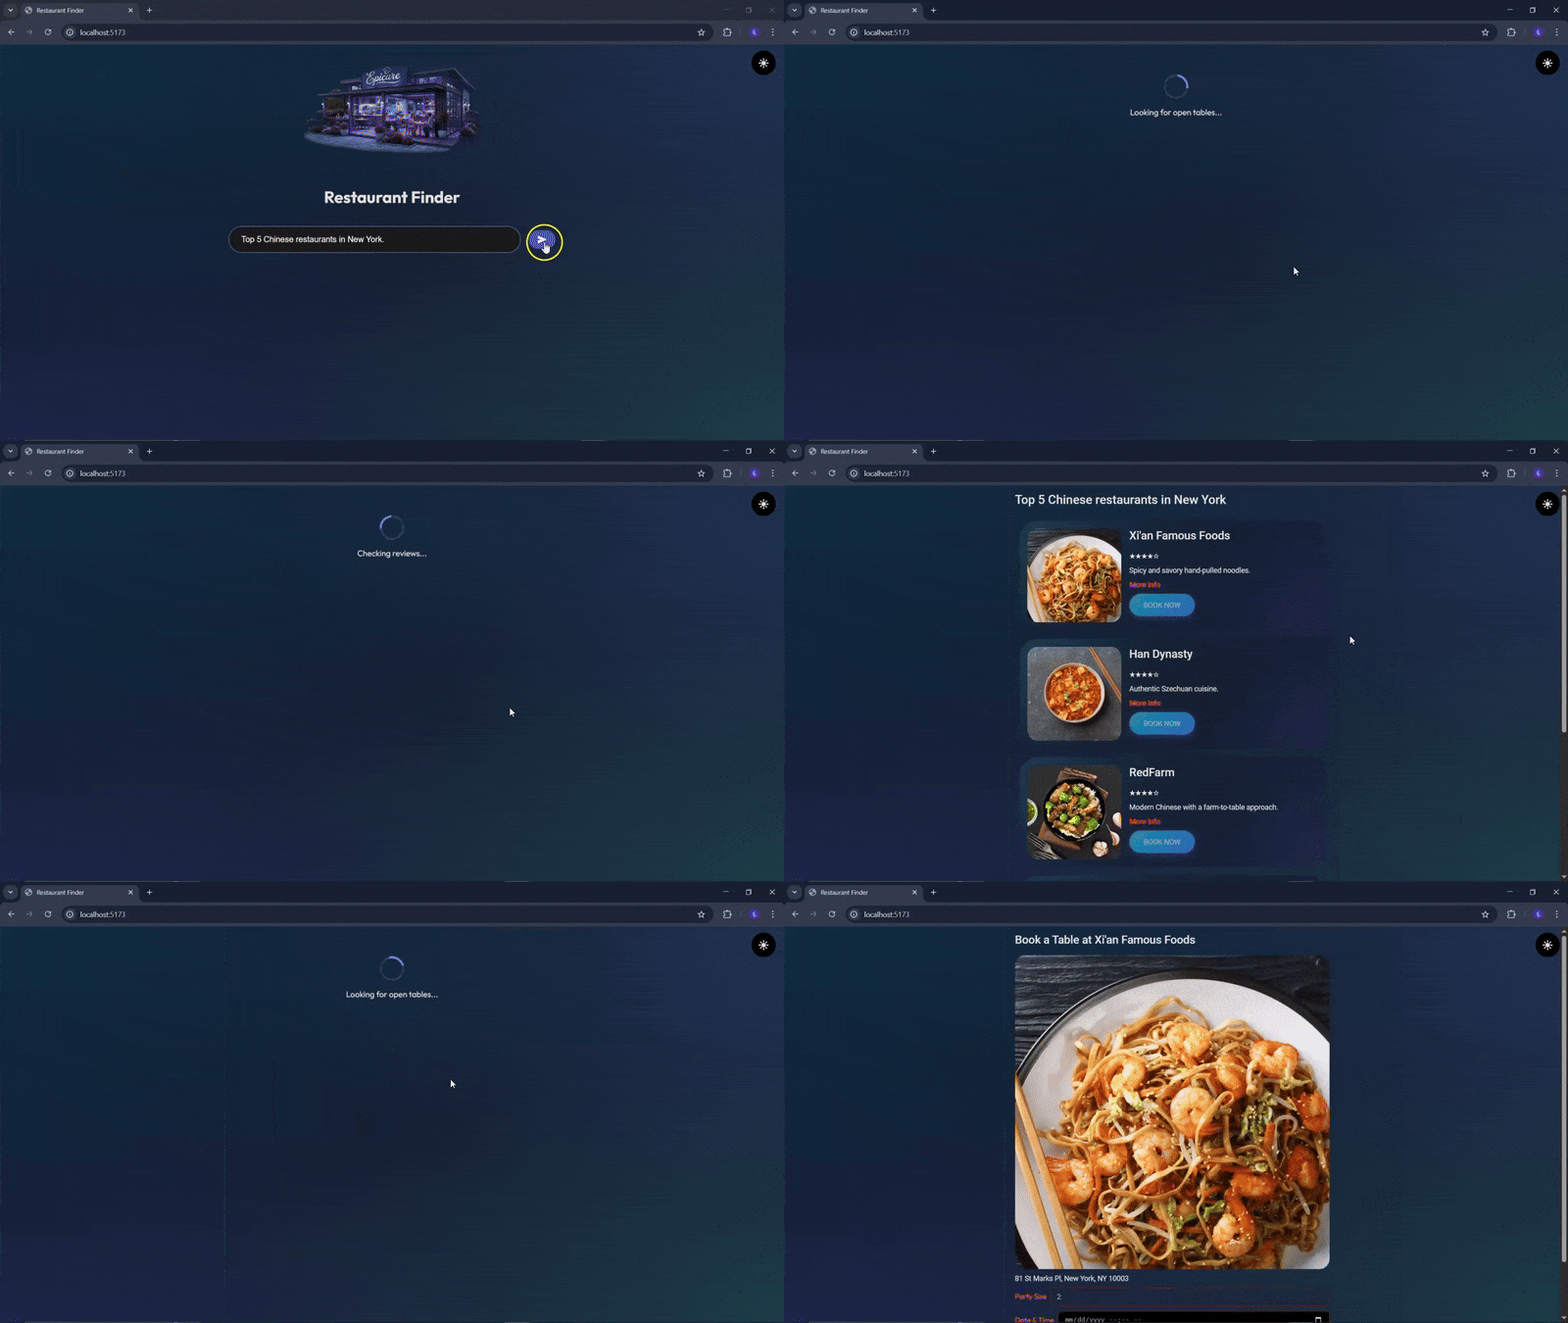
Now, open your browser to http://localhost:4200. As you interact with the agent, you’ll see the UI update dynamically based on the JSON it receives from the backend.
Let’s play around with it:
Take a look at the logs, and you’ll see Gemini return a description of the UI, which the A2UI protocol then renders on the client.
Building with the A2UI bridge
Now that we’ve seen the official implementation, let’s implement A2UI in our React app using A2UI Bridge, a community-created React renderer for the A2UI protocol.
Creating the project
First, you’ll need to set up a React project. In this case, the project is initialized using Vite.
After that, install the following dependencies:
npm install @a2ui-bridge/core @a2ui-bridge/react @a2ui-bridge/react-mantine
Then go ahead and install the Google SDK for our AI connection:
npm install @google/genai
Here’s what each package does:
@a2ui-bridge/core– The core A2UI protocol@a2ui-bridge/react– React bindings for A2UI@a2ui-bridge/react-mantine– Pre-built Mantine component adapters@mantine/core– Mantine’s component library@google/genai– Google’s latest Gemini SDK
Next, set up our Gemini API key.
Create a new file called .env in your project root:
VITE_GEMINI_API_KEY=your-api-key-here
Replace your-api-key-here with your actual Google AI Studio API key.
Over 200k developers use LogRocket to create better digital experiences
 Learn more →
 Configuring Mantine
Mantine needs a provider wrapper to work. Open src/main.tsx and update it to look like this:
import { StrictMode } from 'react' import { createRoot } from 'react-dom/client' import { MantineProvider } from '@mantine/core'; import '@mantine/core/styles.css'; import App from './App.tsx' createRoot(document.getElementById('root')!).render( <StrictMode> <MantineProvider> <App /> </MantineProvider> </StrictMode>, ) We imported MantineProvider and wrapped our App with it. Now every component can use Mantine’s theming and components.
Building the Gemini AI service
Start by creating a new file called geminiService.ts, then add the following code. This file will be responsible for talking to the Gemini API and turning a natural-language prompt into A2UI messages.
import { GoogleGenAI } from '@google/genai'; import type { ServerToClientMessage } from '@a2ui-bridge/core'; We import the Gemini client from @google/genai and the ServerToClientMessage type from A2UI, so our function returns strongly typed UI messages.
Next, we create a Gemini client instance using an API key stored in an environment variable.
const ai = new GoogleGenAI({ apiKey: import.meta.env.VITE_GEMINI_API_KEY }); Keeping the API key in import.meta.env makes this service easy to configure across environments without hardcoding secrets.
Next, create a single function: generateUIFromPrompt. It accepts a user’s description of a UI and returns an array of A2UI messages.
export async function generateUIFromPrompt( prompt: string ): Promise<ServerToClientMessage[]> { At a high level, this function sends the prompt to Gemini with strict instructions, cleans up the model’s response, and then parses and validates the result as A2UI messages.
Sending structured instructions to Gemini
Inside the generateUIFromPrompt function, call GoogleGenAI’s generateContent method and pass a carefully constructed prompt.
More great articles from LogRocket:
- Don't miss a moment with The Replay, a curated newsletter from LogRocket
- Learn how LogRocket's Galileo AI watches sessions for you and proactively surfaces the highest-impact things you should work on
- Use React's useEffect to optimize your application's performance
- Switch between multiple versions of Node
- Discover how to use the React children prop with TypeScript
- Explore creating a custom mouse cursor with CSS
- Advisory boards aren’t just for executives. Join LogRocket’s Content Advisory Board. You’ll help inform the type of content we create and get access to exclusive meetups, social accreditation, and swag
const resp ai.models.generateContent({ model: 'gemini-2.5-flash', contents: [ { role: 'user', parts: [{ text: `You are a UI generator. Create A2UI Bridge JSON messages based on the user's request. IMPORTANT: Return ONLY a valid JSON array with no markdown formatting, no code blocks, no explanations.` The key idea here is that we are not asking Gemini to generate HTML or React. We explicitly tell it to behave as a UI generator that outputs A2UI Bridge JSON. The prompt strongly constrains the model’s output, reduces ambiguity and makes the response easier to parse reliably.
Defining the schema structure
Add the following to geminiService.ts:
Structure: [ { "beginRendering": { "surfaceId": "@default", "root": "root-component-id" } }, { "surfaceUpdate": { "surfaceId": "@default", "components": [ { "id": "unique-id", "component": { "ComponentType": { /* properties */ } } } ] } } ] Defining the available UI components
Add the following to geminiService.ts, just below the structure:
Available Components: 1. Button: { "Button": { "child": "text-id", "action": { "submitAction": { "actionType": "button-action" } } } } 2. Text: { "Text": { "text": { "literalString": "Display text here" } } } 3. TextField: { "TextField": { "label": { "literalString": "Field Label" }, "text": { "literalString": "" } } } 4. Column: { "Column": { "children": ["child-id-1", "child-id-2"] } } 5. Row: { "Row": { "children": ["child-id-1", "child-id-2"] } } 6. Checkbox: { "Checkbox": { "label": { "literalString": "Checkbox Label" }, "checked": false } } 7. Select: { "Select": { "label": { "literalString": "Select Label" }, "data": [{ "value": "option1", "label": "Option 1" }], "placeholder": { "literalString": "Choose an option" } } } 8. DatePicker: { "DatePicker": { "label": { "literalString": "Date Label" }, "placeholder": { "literalString": "Pick a date" } } } 9. Card: { "Card": { "children": ["child-id-1", "child-id-2"] } } 10. Tabs: { "Tabs": { "defaultValue": "tab1", "children": ["tab-1-id", "tab-2-id"] } } 11. TabsList: { "TabsList": { "children": ["tab-trigger-1", "tab-trigger-2"] } } 12. TabsTrigger: { "TabsTrigger": { "value": "tab1", "child": "tab-label-id" } } 13. TabsPanel: { "TabsPanel": { "value": "tab1", "children": ["content-id-1"] } } 14. Modal: { "Modal": { "opened": false, "title": { "literalString": "Modal Title" }, "children": ["modal-content-id"] } } This prompt lists every component the model is allowed to use, such as Button, Text, TextField, Column, and Row, along with their expected shapes.
This acts as a contract. The model is free to compose UIs, but only using known components and schemas that your renderer already understands.
To further anchor the output, add a complete example of a valid response for a simple button UI to the prompt:
Example for a button: [ { "beginRendering": { "surfaceId": "@default", "root": "my-button" } }, { "surfaceUpdate": { "surfaceId": "@default", "components": [ { "id": "my-button", "component": { "Button": { "child": "button-label", "action": { "submitAction": { "actionType": "click-action" } } } } }, { "id": "button-label", "component": { "Text": { "text": { "literalString": "Click Me" } } } } ] } } ] This example dramatically improves consistency by showing the model exactly what a correct A2UI message sequence looks like.
Injecting the user’s request
At the end of the prompt, insert the user’s actual request.
User request: ${prompt} Return ONLY the JSON array, no markdown: This allows Gemini to generate a UI tailored to the user’s intent while still staying within the defined constraints.
Next, add these validation guards against malformed responses to prevent downstream rendering errors:
if (!response.text) { throw new Error('No response text received from Gemini API'); } let c c ''); c ''); c ''); c const messages = JSON.parse(content) as ServerToClientMessage[]; if (!Array.isArray(messages) || messages.length === 0) { throw new Error('Invalid response: Expected non-empty array'); } return messages; } When the AI responds, it sometimes wraps the JSON in markdown code blocks, so we strip these out using regular expressions before parsing. We parse the cleaned string and assert that it matches the expected A2UI message shape.
Building the App component
Now let’s wire everything together in our main App component.
Open App.tsx and replace its contents with this:
import { useState } from 'react'; import { useA2uiProcessor, Surface } from '@a2ui-bridge/react'; import { mantineComponents } from '@a2ui-bridge/react-mantine'; import type { UserAction } from '@a2ui-bridge/core'; import { Textarea, Button } from '@mantine/core'; import { generateUIFromPrompt } from './geminiService'; import './App.css'; function App() { const processor = useA2uiProcessor(); const [aiInput, setAiInput] = useState(''); const [loading, setLoading] = useState(false); const examples = [ { label: '👋 Hello Button', prompt: 'A button that says Hello World' }, { label: '📝 Login Form', prompt: 'Create a login form with username and password fields and a submit button' }, { label: '📋 Registration Form', prompt: 'A registration form with email, password, and confirm password fields arranged vertically' }, { label: '👤 User Card', prompt: 'A card with a user profile containing a title and description' }, ]; const handleExampleClick = (prompt: string) => { setAiInput(prompt); }; const handleAiSubmit = async () => { if (!aiInput.trim()) return; setLoading(true); try { const messages = await generateUIFromPrompt(aiInput); processor.processMessages([{ deleteSurface: { surfaceId: '@default' } }]); processor.processMessages(messages); console.log('Generated UI:', messages); } catch (error) { console.error('Error generating UI:', error); alert('Failed to generate UI. Check console for details.'); } finally { setLoading(false); } }; const handleAction = (action: UserAction) => { console.log('Action received:', action); }; return ( <div className="app-container"> <div className="sidebar"> <div className="info-box"> <h3>How to Use</h3> <p>Describe the UI you want to create in natural language. The AI will generate it for you!</p> </div> <div className="sidebar-content"> <Textarea placeholder="E.g., Create a login form with username and password fields and a submit button" value={aiInput} => setAiInput(event.currentTarget.value)} minRows={6} autosize maxRows={12} styles={{ input: { fontSize: '0.95rem', lineHeight: 1.6 } }} /> <Button loading={loading} disabled={!aiInput.trim() || loading} size="lg" fullWidth gradient={{ from: '#667eea', to: '#764ba2', deg: 135 }} variant="gradient" > {loading ? 'Generating...' : 'Generate UI'} </Button> <div className="examples-section"> <h3>Quick Examples</h3> <div className="examples-grid"> {examples.map((example, index) => ( <button key={index} className="example-button" => handleExampleClick(example.prompt)} disabled={loading} > {example.label} </button> ))} </div> </div> </div> </div> <div className="main-content"> <div className="main-content-inner"> <Surface processor={processor} comp /> </div> </div> </div> ); } export default App; The useA2uiProcessor hook manages our dynamic UI state. It processes A2UI messages and tracks rendered components. We track two things: the user’s input and a loading flag. The example prompts give users quick start options. The Surface component renders everything. It takes messages from the processor and converts them into React components using the Mantine adapters.
When users interact with generated components, like clicking a button, those actions flow through handleAction.
Let’s finally add some CSS styles to this. Copy and paste this in your CSS file:
.app-container { display: flex; flex-direction: row; min-height: 100vh; } .sidebar { width: 30%; padding: 32px; background: rgba(255, 255, 255, 0.95); backdrop-filter: blur(10px); border-right: 1px solid rgba(0, 0, 0, 0.1); box-shadow: 2px 0 20px rgba(0, 0, 0, 0.1); display: flex; flex-direction: column; gap: 20px; overflow-y: auto; } .sidebar h1 { font-size: 1.75rem; margin: 0; background: linear-gradient(135deg, #667eea 0%, #764ba2 100%); -webkit-background-clip: text; -webkit-text-fill-color: transparent; background-clip: text; font-weight: 700; letter-spacing: -0.5px; } .sidebar-content { display: flex; flex-direction: column; gap: 16px; flex: 1; } .info-box { background: linear-gradient(135deg, rgba(102, 126, 234, 0.1) 0%, rgba(118, 75, 162, 0.1) 100%); border-radius: 12px; padding: 16px; border: 1px solid rgba(102, 126, 234, 0.2); } .info-box h3 { margin: 0 0 8px 0; font-size: 0.875rem; font-weight: 600; color: #667eea; text-transform: uppercase; letter-spacing: 0.5px; } .info-box p { margin: 0; font-size: 0.875rem; color: #666; line-height: 1.6; } .examples-section { margin-top: 8px; } .examples-section h3 { margin: 0 0 12px 0; font-size: 0.875rem; font-weight: 600; color: #667eea; text-transform: uppercase; letter-spacing: 0.5px; } .examples-grid { display: grid; grid-template-columns: repeat(2, 1fr); gap: 8px; } .example-button { padding: 10px 12px; border: 1px solid rgba(102, 126, 234, 0.3); background: rgba(102, 126, 234, 0.05); border-radius: 8px; font-size: 0.8rem; font-weight: 500; color: #667eea; cursor: pointer; transition: all 0.2s ease; text-align: left; white-space: nowrap; overflow: hidden; text-overflow: ellipsis; } .example-button:hover:not(:disabled) { background: rgba(102, 126, 234, 0.15); border-color: rgba(102, 126, 234, 0.5); transform: translateY(-1px); box-shadow: 0 2px 8px rgba(102, 126, 234, 0.2); } .example-button:active:not(:disabled) { transform: translateY(0); } .example-button:disabled { opacity: 0.5; cursor: not-allowed; } .main-content { width: 70%; padding: 32px; overflow-y: auto; background: linear-gradient(135deg, #667eea 0%, #764ba2 100%); display: flex; align-items: center; justify-content: center; } .main-content-inner { background: #778ce8; border-radius: 5px; padding: 32px; box-shadow: 0 10px 40px rgba(0, 0, 0, 0.1); min-height:70%; max-height:70%; width: 50%; } Go ahead and test it out in the browser:

You can check out the full demo codebase in this GitHub repo.
Conclusion
A2UI changes how we think about interacting with AI agents. Instead of forcing everything through chat, it gives agents a way to present real interfaces when the task calls for it. That shift enables clearer workflows, better user input, and far more control over complex interactions.
In this walkthrough, we explored the A2UI protocol and built a working UI generator using a2ui-bridge, a React-based renderer. The model strikes a thoughtful balance between structure and flexibility: agents describe intent, the UI adapts, and the client remains in control.
A2UI is still evolving. As the ecosystem matures, we can expect official renderers for popular frameworks, richer component libraries, stronger tooling and debugging support, and deeper integrations with more AI providers. What A2UI ultimately signals is a move toward graphical, interface-driven AI interactions. In that sense, it feels a lot like the Telegram Mini App equivalent for AI agents: lightweight, interactive, and surprisingly powerful.
- #ai



Stop guessing about your digital experience with LogRocket
Get started for freeRecent posts:

AI dev tool power rankings & comparison [Feb. 2026]
Compare the top AI development tools and models of February 2026. View updated rankings, feature breakdowns, and find the best fit for you.
 Chizaram Ken Feb 13, 2026 ⋅ 10 min read
How to solve package validation pain with Publint
Broken npm packages often fail due to small packaging mistakes. This guide shows how to use Publint to validate exports, entry points, and module formats before publishing.
 Rahul Chhodde Feb 12, 2026 ⋅ 5 min read
The Replay (2/11/26): React performance wins, fine-grained frameworks, and more
Discover what’s new in The Replay, LogRocket’s newsletter for dev and engineering leaders, in the February 11th issue.
 Matt MacCormack Feb 11, 2026 ⋅ 34 sec read
A complete guide to React performance optimization
Cut React LCP from 28s to ~1s with a four-phase framework covering bundle analysis, React optimizations, SSR, and asset/image tuning.
 Shruti Kapoor Feb 11, 2026 ⋅ 9 min read View all posts
 Leave a ReplyCancel reply
Would you be interested in joining LogRocket's developer community?
Yea No ThanksJoin LogRocket’s Content Advisory Board. You’ll help inform the type of content we create and get access to exclusive meetups, social accreditation, and swag.











Comments
0 comment